Images always help to make our blog look good to our readers. In this tutorial you'll learn how to add images to your blog post and how to style your image with nice effects.
How to add images to your blog post?

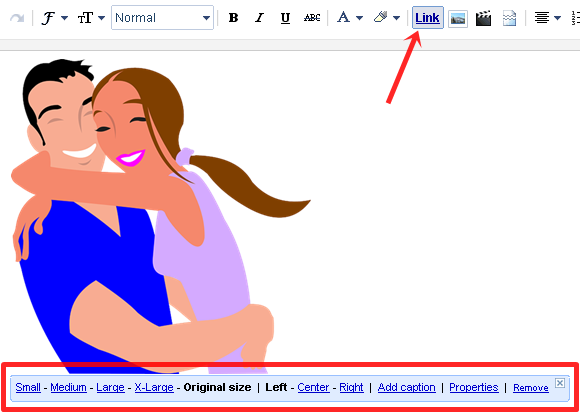
By default your image is linked to its image source url. You can always remove it with the help of link button on the blog post editor. For that simply follow these steps. First click on the image and then click on the" Link" button on your post editor.
With the "Add caption" button you can add a small text under your image. Properties where you put a your title and your alt text. Alt text stand for alternative text. If a blog reader visit your blog with an image disabled web browser they will be presented with the alt text. alt text should be short. Title of the image is shown when someone hover over the image. This should be descriptive.
How to style your image?
Now we have already uploaded an image to our blog post and removed the link of the image url. Let’s analyze the HTML code of our image, in the HTML side of the blog post editor. Below is the code we got.
<div class="separator" style="clear: both; text-align: center;">

<img border="0" src="https://blogger.googleusercontent.com/img/b/R29vZ2xl/AVvXsEg7-gquXFRX936hO6YGyaDxaXo15K3c-R8pP6lwGkx1X9P4BfqkDn13PtwJQ8mkdypFfrnG_dQDR2p6z-9eHqvIZqjmntJoC1dYlrJm2LuhQx5ZdLibP0pSNONW-3B_uqh-LLoI2Rcyjs3O/s1600/post-eitor-with-image.png" height="228" width="320" />


</div>
Like in our previous lessons, here also you can change the height and width of your image for your desire.height="228" width="320
You can also change the thickness of the border by changing zero in border="0" to any value you desire( eg: border="2px"). It will result in a solid black border around your image.
Can you see that you have a part of coding like below in your HTML code?
src="https://blogger.googleusercontent.com/img/b/R29vZ2xl/AVvXsEg7-gquXFRX936hO6YGyaDxaXo15K3c-R8pP6lwGkx1X9P4BfqkDn13PtwJQ8mkdypFfrnG_dQDR2p6z-9eHqvIZqjmntJoC1dYlrJm2LuhQx5ZdLibP0pSNONW-3B_uqh-LLoI2Rcyjs3O/s1600/post-eitor-with-image.png
This implies the source of your image. "src" stands for source. Inside the "src" attribute we have given the location of our image.
Blogger itself have a border style for images. The HTML coding for the default blogger images is given by below part of code.
<div class="separator" style="clear: both; text-align: center;">
You can remove it's default style by removing class="separator" part inside the "div" open tag. You can also add a style attribute inside the image just like we added a style attribute in the embed YouTube video lesson.
In the following code we removed class="separator" part inside the "div" open tag and added a custom style attribute inside the image tag.
<div style="clear: both; text-align: center;">
<img style="box-shadow:0px 0px 10px #999999; border:2px solid #666666;" border="0"src="https://blogger.googleusercontent.com/img/b/R29vZ2xl/AVvXsEg7-gquXFRX936hO6YGyaDxaXo15K3c-R8pP6lwGkx1X9P4BfqkDn13PtwJQ8mkdypFfrnG_dQDR2p6z-9eHqvIZqjmntJoC1dYlrJm2LuhQx5ZdLibP0pSNONW-3B_uqh-LLoI2Rcyjs3O/s1600/post-eitor-with-image.png"height="228" width="320" />
</div>
Copy the code
Below is the live preview when we paste the above code in the Live HTML Editor.
That's all about images. Have a nice day.
No comments:
Post a Comment